nut free

Gingerbread Sweetpotato Dream Cake

Well here’s a winter treat worth sharing. This creamy raw cake gets its surprising richness from sweet potato and gentle warmth from gingerbread spices. And lemme tell you that it is one heavenly union.

Made in collaboration with Electrolux Explore 7 blender and Asennemedia

As you may may have noticed from my previous blog post where I launched my new ebook Dreamy Season – Wholesome food for Holidays & winter, I’m kinda of a Christmas freak. Like I could actually eat Christmas related food the whole winter season and when it comes to Christmas recipes, my imagination seems to be endless.

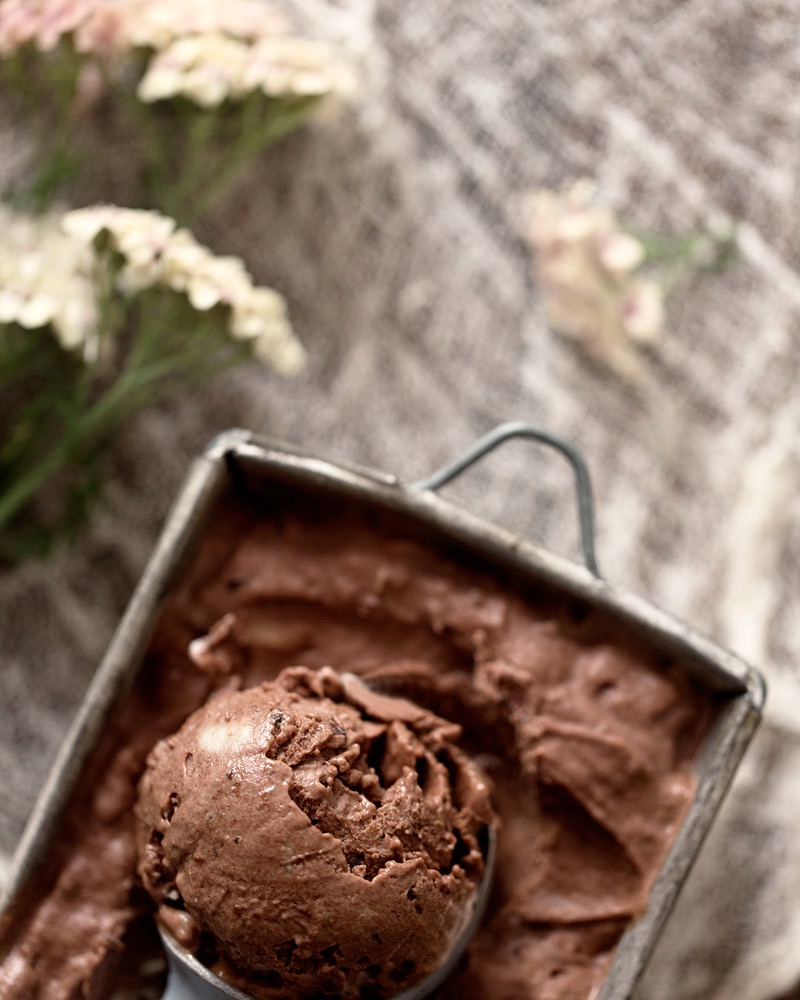
One of my favorite nice cream recipes I’ve ever created is a gingerbread nice cream that has sweet potato in it. Homehow those two elements make a perfect match and I’ve been wanting to bring them together in some other dish too.

Gingerbread Sweetpotato Dream CakeElectrolux Explore 7 blender

The idea evolved when I got to test the new Electrolux Explore 7 blender. As the first thing I wanted to try with it was a smoothie. I’m kind of a smoothie nerd and my way to test a blender is to see how smooth it actually makes my smoothie. And I have to say I was kind of surpised. Blenders in this price group usually leave smoothies a bit grainy but this baby blended them smooth as velvet. Really nice job.

The second thing I wanted to test was a raw cake. The batter there is thicker than in a smoothie so it gives new challenges to the blender. Again, very nice, very smooth. One great feature in Explore 7 blender is that it’s designed in a way that though it makes mixtures smooth it doesn’t heat up the ingredients so it keeps everything fresh and the nutrients alive n´ kicking. It isn’t a blender for thick nut butters, raw cake crusts etc, but you can definitely make great soups, smoothies, raw cake batters, grind nuts and even make juice (!) with it. Plus it’s pretteehh.

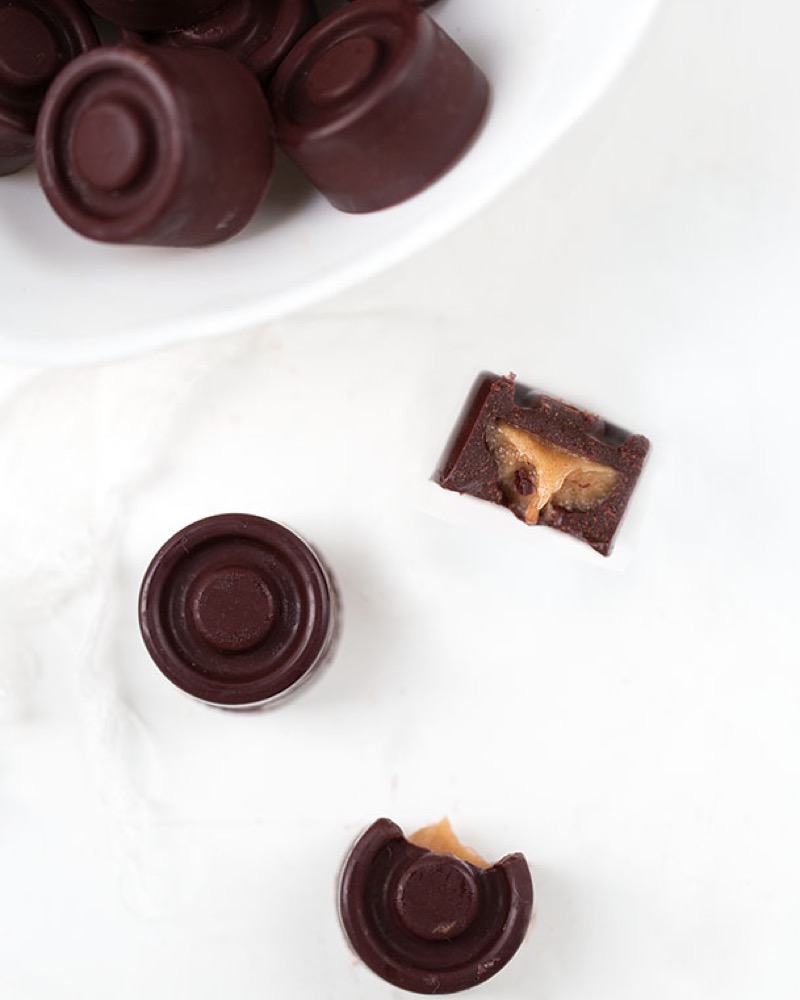
Oh, and back to my sweet potato gingerbread matching mission. So when I challenged the blender with a raw cake I wanted to make something christmassy. Because of my christmas mania condition, you know. Then I remembered the heavinly union of the gingerbread and sweet potato in my nice cream and the idea was born. Also wanted to make a nut-free raw cake for a change, as people ask me about them constantly.

And it came one fine piece of cake, I have to admit.

Try it yourself to get yourself into Christmas mood and let me know how it resonates! And if the Explore 7 blender resonated, tune into my Instagram as I’m giving away one blender on my today’s IG post. See you there!

V

Shop

Hello, love! I have one pretty delicious weekend greeting here for you! And it comes in a form of a pizza. I hope you like sweet potato, because this pizza crust is all about it. I mean ALL about it. Totally and completely. Nothing else added.

One of the most popular everyday foods in our household are mini pizzas made on small sweet potato slices. We all love them. They are super easy to make and it takes less than 30 minutes to get them ready. The only thing that started bugging me in the whole mini pizza process was that I always have to add all the toppings separately on each and every slice. So, as a great optimizer as I am, I started to think how could I use the same idea but in a bigger pizza size.

After a few test batches I found out that when I slice the sweet potato lengthwise with a cheese slicer and place the slices overlapping on a baking tray in a form of a round pizza, it makes a great crust which cooks up quickly. And when I sprinkle on some organic mozzarella (and/or feta or vegan cheese) it works like a glue for the slices and makes the pizza easy to eat. Of course you won’t get it as firm as a normal pizza crust would be, but firm enough so you can eat it decently – and with a smile on your face, because it’s just so so tasty.

As a pizza topping I used loads of greens, lovely vegetables and fresh herbs, which made the whole thing look so generous and verdant, especially when I added some edible flowers on it, that I named it the Green Goddess Sweet Potato Pizza. Talk about life energy and abundance.

If you like it more hard core, go ahead and add some organic meat and cheeses on, if you feel you get your divine energies better that way. My kid loves her sweet potato pizza with some tomato puree, tuna (MSC certified, of course) and pineapple. And as she’s going through some picky state of life, I let her enjoy it that way and won’t push my greens on her pizza.

What I love most about this recipe is that it takes less than 30 minutes to make and you can use almost anything you happen to have in the fridge, as long as you have sweet potatoes. As a person who live is the moment, not planning too much her eatings and at the same time gets VERY hungry VERY quickly this kind of a dish is just priceless.

So, there you go! I hope this delivered you some inspiration for the weekend. May the pizza goddess light your way to the kitchen!


V

Makes 1 pizza


Crust:

2 medium sized sweet potatoes

olive oil

sea salt

black pepper

pizza spice mix

garlic clove, minced


Filling:

pesto sauce

4.5 oz organic mozzarella (and/or feta or vegan cheese)

a couple of handfuls baby spinach leaves

1 spring onion

4 stalks of sweet baby broccoli

artichoke hearts (cooked/from a jar)

3 slices of lemon

pine nuts

olives

fresh oregano

fresh basil

sunflower sprouts


Preheat the oven to 390 Fahrenheit / 200 Celsius degrees. Cover a baking tray with a parchment paper. Peel the sweet potatoes and slice them with a cheese slicer or a mandolin vegetable slicer into very thin, almost transparent slices. Arrange the sweet potato slices on the baking tray so that they touch each other, making a circle. Fill in all the holes and also the inner circle, so that you get a circle with no holes or see-through spots. Now sprinkle on some olive oil, salt, black pepper and pizza spice mix. Also add garlic. Bake in the oven for 10-15 minutes until the sweet potato slices soften. Take out from the oven. Spread some pesto on the crust and add the cheese. Add also the spinach leaves. Cut the spring onion and broccoli into small pieces and sprinkle them on the pizza. Slice the artichoke hearts and add them with lemon slices, pine nuts and olives. Bake in the oven for 10 minutes until the cheese melts and the filling gets a nice tanned color. Take out of the oven and season with fresh oregano and basil + sprouts. Serve and enjoy!

I just love homemade yogurts. Dairy free homemade yogurts. There’s something magical in the whole process, which is sort of an alchemy or some other mystical procedure where you play with the forces of nature. Living cultures of good bacteria, to be exact.

I also love the fact that only sky seems to be a limit to what different kinds of yogurts you can prepare: With what ingredients and spices you make it, how strong and sour you want it to be and so on.  

When I was creating the yogurt recipe for this blog post I noticed that I have actually tried out quite a big range of different kinds of ingredients for homemade vegan yogurts and also managed to get at least one vegan yogurt recipe in every single cookbook I’ve ever made, no matter what the subject has been.  

In It’s a Pleasure – Sweet treats without gluten, dairy and refined sugar there are recipes for Coconut Yogurt and Almond Yogurt. In my Healthy Fast Food book (Only in Finnish) there are Fruit Bomb Yogurt and Chia yogurt and in the Christmas book (Also only in Finnish) there is this Oven Apple Yogurt made with Oatmeal and Apples. And also from the N’Ice Cream book you can find a recipe for Breakfast popsicles made from homemade vegan yogurt.

So it looks like I have a bit of an obsession about this theme. But a good obsession, I must say!

Because without that obsession I would have not for example created this Blueberry Quinoa Yogurt. …I knooow, it sounds quite quirky – Quinoa Yogurt. (Maybe I should have named it a Quirky Quinoa Yogurt, ha!) But at least here in Finland one of the most popular vegan yogurts are based on oats and well, quinoa isn’t that much different. Just remember to add enough berries (other berries will do also!) and sweetener as the taste of quinoa alone can be a bit strong. 

I was actually quite surprised after my first test batch when I tried to google if someone else had made something similiar, but couldn’t find anything. Nada! No quinoa yogurts on the market or quinoa yogurt recipes in the whole world wide web! Really? Gotta get my Quirky Quinoa Yogurt Factory running asap! Who’s in? Throw me an email and we’ll start a yogurt revolution together!

But now, will you excuse me, I have to get back to my office aka my bed and make new inventions. I got these ah-mazingly fluffy and soft Feel blankets & pillows from Familon with crispy duvet covers made from percale cotton to our new home and since then it has felt a surprisingly good idea to have a home office – and a studio – and a dinning spot – in the my bed.

I wish you a cozy and yogurt-filled weekend, my love!

Oh, and if you feel you don’t have time nor the patience for the fermentation process, you can as well eat the yougurt straight from the blender, as it can be enjoyed as a whipped porridge as it is!

V

In collaboration with: Familon 

2 cups quinoa (cooked)

2 cups oat milk (or some other dairy free milk)

½ cup blueberries (fresh or frozen and thawed)

2-4 tbsp raw organic honey or coconut syrup

2 capsules of probiotics

½ tsp vanilla powder

Cook the quinoa according to the instructions in the package. Let it cool. Pour the quinoa into a blender and add the oat milk, blueberries and the sweetener. Blend until very smooth. Add more liquid, if needed, to create as smooth texture as possible. Taste and add more sweetener or blueberries, if you like. Open the probiotic capsules and pour the powder to the mixture. Mix gently. Pour the mixture into a sterilized and totally dry glass jar. You can sterilize the jar with boiling water in a big pot (for couple of minutes) or washing it in a dishwasher. Make sure not to leave any water in the jar. Close the jar with a lid or cover with a cheesecloth and a rubber band. Turn the oven light on but do not heat the oven. The oven light should keep the oven warm enough for the yogurt. Place the yogurt in the oven with the light on and leave the yogurt to set for about 8 – 12 hours. The longer you let the yogurt ferment, the stronger and sourer the flavor will be. Take the jar from the oven, stir in vanilla ja put the jar in the fridge and let it cool. Consume within a week.
The swirls in the picture are created with a white Almond Yogurt – Get the recipe here!

Time to fulfil your wishes. Your nut-free wishes! Nearly every time I post a new sweet recipe I get messages from my lovely readers with allergies asking if it would be possible for them to prepare the recipe without nuts or almonds. Most of the times I have to disappoint them because nuts and almonds play such a significant role in many raw/health recipes, and the recipe just wouldn’t be the same if you substitute them with something else.

But now, my babies – now I have something magnificent for you! Something that is nut-free, raw, vegan, gluten free, dairy free and naturally sweetened, all at the same time. And delicious too! This one is truly a crowd pleaser.

And it doesn’t lay on coconut! Many times nut-free treats use coconut to get the creamy rich texture, but I know that the taste of the coconut doesn’t please everyone. And I have to admit that I don’t prefer a strong coconut flavor either and nowadays I use coconut in my recipes in veeery subtle ways so that the strong hippie vibe doesn’t push through. (All my love to hippies ♡)

So, therefore I picked a more neutral ingredient here that still gives a nice wholesome consistency. I picked chickpeas – le chick! Those brilliant little creatures that are so versatile, nutrient-rich and lovely. Then I accompanied them with fresh organic dates. Because dates are my no. 1 favorite sweeteners and they also add a nice little bonus to the texture and taste. I really could not survive without fresh dates in my kitchen.

Which brings to mind another quoestion I get asked a lot – Which dates do I use? Well, the ones that you can always find from my kitchen are fresh organic dates by Fontana that are sold in cardboard boxes in fruit ja vegetable section in supermarkets – at least here in Finland. I like the texture, the taste and the fact that they are organic. They are also easy to find because they are available very widely in the supermarkets – at least here in Helsinki. So I was very happy to pair up with Fontana with this post, because I actually use their dates A LOT.

And here’s my hot tip for a natural date sweetener:

Buy a package of fresh dates. Preferably organic. Take about 20 dates, take out the stones and place the dates in a blender. Add about 1 cup water and 1 tsp vanilla extract or ½ tsp vanilla powder, if you like. Blend until creamy and smooth sauce. Add more water, if needed. And if you like your sauce to be extra smooth, remove the date skins under a running water. Then pour the sauce inside a sealable clean jar. Now you have a lovely sweetener that you can use when baking in breakfasts or in any way you want. Store the date paste sealed in a fridge and you can use it easily for 2 weeks.

Now there you have it. Go ahead and make this date caramel paste & my Le Chick! Caramel Bars and serve them for example to your Valentine next week. Moi moi!

V

In collaboration with: Fontana organic dates

(Nut-free, Vegan, Gluten-free, Dairy-free, Refined sugar-free)


Base:

1 cup chickpeas (cooked / from a can)

10 fresh dates, pitted

5 tbsp coconut flakes / shredded coconut

½ tsp vanilla powder (or 1 tsp vanilla extract)


Caramel:

10 fresh dates

3 tbsp tahini (or your favorite nut/almond butter)

3 tbsp coconut oil, melted

3 tbsp water

3 tbsp coconut syrup (or raw organic honey)

½ tsp vanilla powder (or 1 tsp vanilla extract)

a tiny pinch of sea salt


Chocolate frosting:

6 tbsp raw cacao butter, melted

4 tbsp coconut oil, melted

6 tbsp raw cacao powder

4 tbsp coconut syrup (or raw organic honey)

a tiny pinch of sea salt


OR about ½ cup of your favorite raw chocolate melted


Tin size: 17 x 12 cm / 7 x 5 inches


Base:

Cover the tin or the freezer safe container with parchment paper. Add the chickpeas into the blender and blend. Add dates, coconut flakes and vanilla and mix until a thick sticky mass. You may have to scoop down the sides of the blender in between blending. Taste and if you want add vanilla or other sweetener, for example coconut syrup. Spoon out the dough into the tin and even the surface with a spoon. Prepare the caramel sauce.


Caramel sauce:

Place all the ingredients into the blender and blend until sticky sauce. Add a drop of water, if needed, but try to keep the mixture as thick as possible. Spoon out the caramel sauce and spread onto the base mixture. Prepare the chocolate frosting.


Chocolate frosting:

Melt cocoa butter and coconut oil in a warm water bath. Add cocoa powder, syrup and salt. Mix until a nice sauce. Taste and add more some of the ingredients, if needed. Pour the chocolate mixture onto the caramel sauce. Put into the freezer and freeze for a couple of hours or until solid. Take out of the freezer and cut into bars. Let thaw for about 15 minutes before serving. Store in the freezer or in the fridge.


3 INGREDIENT VEGAN APPLE PIE

  • 3 sweet apples
  • 1 ⅓ cup (3 dl) rolled oats
  • 4 tbsp melted coconut oil
  • +ceylon cinnamon on top

(pan size: 7 inches/18 cm)

Preheat the oven to 425 F/225 C degrees. Cut 2 apples into pieces and place into a blender. Puree until smooth. Add rolled oats and coconut oil. Blend well. Cover the bottom of a cake pan with a parchment paper and grease the sides. Pour the batter into the pan and spread evenly. Cut one apple into very thin slices and cover the surface on the pie with apple slices. Top with plenty of cinnamon. Bake in the oven for about 25 minutes or until the color is nicely golden and the sides and the surface look done and dry. Take it out from the oven and let it cool. Serve and enjoy! Store covered in a room temperature.

Preparing time: 25 minutes

Cake:

  • 4 organic eggs
  • 10-15 fresh sweet dates
  • 1,5 dl raw cacao powder

Cake tin diameter: about 17 cm / 6,5 inches

Preheat the oven to 200 C / 400 Fahrenheit degrees. Grease/oil the sides and the bottom of the cake tin. Cut pieces of parchment paper to cover the bottom and the sides. Remove the stones from the dates and add all the ingredients to the blender. Blend until smooth. Pour the dough into the cake tin and bake for 20-25 minutes until the surface looks dry. Watch out not to dry the cake too much (a tough job!). Let the cake cool completely before you remove the cake from the tin. Notice that the surface will come down quite a bit. Enjoy with chocolate mousse and nut crust or whipped coconut cream and berries!

CHOCOLATE MOUSSE FROSTING

  • 1 can (400 ml) full fat coconut milk (kept in the fridge)
  • 3-5 tbsp raw cacao powder
  • 1 tbsp organic honey (or coconut syrup)

Take the coconut milk can from the fridge and scoop the white thick paste into a bowl. Add cacao powder and sweetener and whip with a mixer until mousse. Taste and add more cacao or sweetness if needed. Use as a frosting.

FOLLOW VANELJA ON:

Instagram

Facebook

Pinterest

Twitter

Vegan meatballs:

( 8-10 pieces)

  • ½ heaping cup sun-dried tomatoes
  • ½ cup sunflower seeds
  • ½ cup chickpeas
  • 5 tbsp flax meal (or flax seeds)
  • 1 small onion
  • 1 tbsp Tamarin soya
  • black pepper
  • a pinch sea salt

For frying:

  • 5 tbsp olive oil or coconut oil

Sweet potato pasta:

  • 1 big sweet potato
  • 2 cup marinara tomato sauce

On top:

  • vegan parmesan cheese (recipe in Kiitos hyvää Pikaruokaa cookbook!) or original organic parmesan cheese
  • fresh basil

Preheat the oven to 400 Fahrenheit/200 Celsius degrees. Measure sun-dried tomatoes into blender and blend until quite smooth. Add rest of the ingredients and blend. Pour the dough into a bowl and form small balls with your hands. If the dough feels too wet add a little bit of coconut flour or other flour. Pour generously oil onto a pan and fry the meatballs for about 5 minutes, until they get a nice brown color. Transfer the meatballs onto a baking tray covered with parchment paper. Bake for about 15 minutes. In the meantime prepare the sweet potato noodles.

Peel the sweet potato and prepare noodles with a spiral slicer or julienne peeler. Add 1 tbsp oil onto a pan and cook the nools for one minute. Add the marinara sauce and cook for about 10 minutes.
Take the meatballs out of the oven. Dose some noodles on plates, add meatballs on top. Grate some vegan cheese or parmesan cheese on top and sprinkle on some fresh basil leaves. Serve and enjoy!

FOLLOW VANELJA ON:

Instagram

Facebook

Pinterest

Twitter

  • 3 frozen bananas
  • 5 tbsp rum
  • 2 tbsp almond liqueur
  • 3 tbsp organic raisins
  • 1,5 tablespoon raw cacao powder
  • 1 tbsp organic honey (or coconut syrup, stevia or sweetener of your choice)
  • 2-3 tbsp almond milk (or other milk), if needed
  • 3 rkl raw cacao nibs

Peel the bananas and cut them into small coins. Put the bananas into an airtight container and freeze for at least 4 hours, or overnight. In the meantime pour the almond liqueur and rum into a small pot ja bring to a boil. Turn the heat down and add raisins to the alcohol mixture and let marinate until the bananas are frozen.

To make the ice cream, add bananas into a blender and pulse until a crumble forms. Keep on pulsing until the bananas start to form a smooth texture. You might have to scrape down the sides of the blender a few times. Add the marinated raisins, chocolate, vanilla and sweetener and keep on pulsing until you get a smooth and creamy ice cream texture. Mix in the raw cacao nibs and stir with a spoon. Scoop into a bowls, serve and enjoy! If the ice cream melts too much while you process it, you can freeze it a little bit before serving.

* More healthy, dairy free ice cream recipes in Kind Ice Cream for You e-book!

Chocolate Pudding Breakfast Cake

Crust:

1 ¼ cup gluten-free rolled oats

4 tbsp sesame seends (or other seeds you like)

½ cup soft dates

2 tbsp coconut oil

1 tsp vanilla extract

a pinch of sea salt  


Filling:

1 ¾ cups oat milk (or coconut milk or other dairy-free milk)

¼ cups chia seeds

¼ cup raw cocoa powder

4-5 tbsp coconut oil (heaping tablespoons soft oil. or alternatively 4 tbls melted cacao butter)

1 ripe banana

1 tsp vanilla extract

4 soft dates

if more sweetness desired, use honey for example


Topping: (not necessary)

Coconut whipped cream. Get the recipe here.


(Size of the pan: max 7 inch or 4 x 8 inch / 17 cm or 10 x 20 cm)

Prepare a small cake tin by putting a piece of paper on the bottom of the tin so that the cake is easier to take out later. Prepare the crust by mixing all ingredients in a blender or use a hand blender. Mix only a little bit so that the dough is easy to mold but the rolled oats do not get grinded into pulver. Taste and add seasoning or sweetness if desired. Press the crust onto the bottom of the cake tin. Prepare the filling.

Put all ingredients in a blender and puree. Taste and add sweetness if desired. Pour the filling into the cake tin and put the tin into the freezer for at least an hour, or until it gets solid.

In the meantime prepare the coconut whipped cream for the top. (Cake goes also well without.) Get the recipe here.

Take the cake from the freezer, remove from the pan and let it melt for a little. Cut the cake into pieces while it is still slighly frozen. Add some coconut whipped cream on top of the cake and sprinkle some raw chocolate, muesli or cocoa powder. Serve and enjoy! Store in a refrigerator.

Follow Vanelja!

Facebook

Instagram

Pinterest

Twitter

1 big or 2 small persimmons (remove skin if not organic)

½ avocado

2 tbls chia seeds

2 tbls pumpkin seeds

2 tbls almond butter (unsweetened)

1 tbls hemp protein powder

1 cup coconut water or oat milk or other liquid desired

1 tsp ceylon cinnamon

½ tsp nutmeg

On top:
sliced persimmon
cinnamon & nutmeg
seeds

Add all ingredients to a blender. Blend until smooth. Add as much liquid as you need to get the consistency you want. Check the taste and add some spices if desired. Pour in bowls and add toppings. Serve and enjoy!


(raw, nut-free)

Chocolate:

  • 1,5 dl of cocoa butter, melted
  • 0,5 dl cold pressed coconut oil
  • 1,5 dl raw cocoa powder
  • 4 tablespoons organic honey (or coconut palm syrup)
  • a pinch of sea salt

OR Use about 2 dl of melted raw chocolate or sugar-free dark chocolate.

Soft caramel filling:

  • 10 soft Dates
  • 2 tablespoons cold pressed coconut oil, melted
  • 3 tablespoons water
  • 0,5 teaspoon vanilla extract
  • a pinch of sea salt
  • plus Caramel Stevia drops (optional)

Melt the cocoa butter and coconut oil in a warm water bath until liquid. Add cocoa powder, honey and salt. Stir. Check the taste and add more sweetness if desired. Pour a little bit of the chocolate mixture in the bottom of a chocolate molds or ice cube molds. Place the mold in the freezer and prepare the caramel filling in the meantime.

Soak the dates for about 15 minutes if they are not super soft. (with completely dry dates this recipe will not work) Remove the stones from dates. Remove the skins of dates, if you want your caramel to be very soft caramel or if your blender is not super effective. Add the dates and melted coconut oil into a blender and mix. Add enough water to get the mixture smooth, soft caramel-like purée.

Take the mold from the freezer and add a dab of caramel filling in each mold with a little spoon or a piping bag. Fill the molds with the remaining chocolate. Put the molds back into the freezer for about half an hour. Take out, serve and enjoy! Store in a refrigerator.

Follow Vanelja!

Facebook

Instagram

Pinterest

Twitter

2 pizzas

Pizza base:

  • 1 cup coconut flour
  • 1 cup tapioca flour (starch)
  • 1 tbsp psyllium husk
  • ½ tsp sea salt
  • ½ cup olive oil
  • ½ cup heated water
  • 2 organic eggs

Filling:

  • 1 cup ricotta cheese
  • 1 Butternut Squash
  • 1 clove of garlic
  • pinch of flake salt
  • black pepper
  • handful of fresh sage

Preheat oven to 440 Fahrenheit/225 Celsius degrees. Combine coconut flour, tapioca flour, psyllium husk and salt in a bowl. Pour in olive oil and warm water and stir. Add the lightly whisked egg. Mix until well combined. Add two to three more tablespoons of coconut flour until the mixture is a soft but somewhat sticky dough. Place the pizza dough ball onto a sheet of parchment paper. Roll out the dough until it is fairly thin. Add flour if needed but be careful that the dough won’t become too dry. Place the rolled out dough into preheated oven and pre-bake for about 12 minutes.

Slice the butternut squash into thin slices with mandolin or with a sharp knife. Take the pre baked pizza crust from the oven. Spoon over some ricotta cheese and place the butternut squash slices on top. Grind on some black pepper and sprinkle some salt finger. Chop one clove of garlic on the surface (or squeeze it on top of baked pizza with a garlic clamp). Bake in the oven for about 15 more minutes. Take out from the oven, top with some fresh sage leaves, serve and enjoy!

Approximately 6 – 8 pieces

  • 1 ripe banana
  • 1 cup / 2,5 dl shredded coconut
  • ½-1 tsp cinnamon

Preheat the oven to 350 Fahrenheit/175 Celsius degrees. Mash the banana with a fork in a bowl and add the coconut flakes and cinnamon. Mix. Taste and add seasoning or sweetness if desired. If the banana you used is very big, and the dough feels too wet and sticky to mold, add more coconut flakes. Shape the cookies into balls on a baking sheet and press them to about 0.2 inch/ half a centimeter thick cookies. Bake for about 20 minutes, until the biscuits get a delicate golden brown color. Allow to cool and enjoy.

  • 1 cup oatmeal
  • 1 cup buckwheat flakes
  • ½ cup grated coconut
  • 4 tbsp raw cocoa powder
  • 3 tbsp honey
  • 3 tbsp cold-pressed coconut oil
  • 2 tbsp almond butter (or any nut butter)
  • 4 tbsp almond milk (or oat milk, coconut milk, etc.)
  • 1 tsp vanilla extract
  • a pinch of sea salt 

    Measure the dry ingredients in a bowl. Melt honey, coconut oil, almond butter and almond oil to a liquid mixture. Pour the mixture into a bowl over dry ingredients. Add vanilla extract and a small pinch of salt. Mix. Taste and add more seasoning if you want. Roll the dough into about a tablespoon-sized cookies on a baking tray or plate. Put the biscuits in the freezer for about half an hour. Serve and enjoy! Store in the freezer or in the refrigerator.

  • 1 cup gluten free rolled oats
  • 1 tbsp of chia-seeds (optional)
  • 1 ¼ cups almond milk (or for example oat milk or rice milk)
  • 1 tbsp unsweetened smooth almond or nut butter of your taste
  • 1 tbsp organic honey or coconut syrup
  • ½ tsp vanilla powder / vanilla seeds
  • ½ tsp of Ceylon cinnamon
  • On top: banana slices


Pour all other ingredients except the banana into a jar and stir carefully with a spoon. Close the lid and leave the mixture to sit in the fridge overnight. In the morning top with banana slices and enjoy your lovely breakfast!

(2 dl)

  • 1 cup liquid organic honey
  • 1 cup hard, crystallized organic honey
  • ¼ tsp vanilla powder

Measure and place both sorts of honey in a blender, mix at low or medium speed (I used Vitamix, the lowest speed). Let the blender run for about 10-15 minutes, depending on the machine. You’ll see how the color of the mixture becomes lighter. If necessary, turn the blender off, so it does not overheat. Finally, mix in the vanilla powder. Pour the mixture into a clean and dry glass jar. Store in room temperature or in the fridge. Whipped honey becomes a little bit stiff in the cold.

Whipped honey can be used as a spread, in baking, with yogurt, fruit or however you wish!

(about 12-15 pieces)

  • 2 ripe bananas
  • 1 ¼ cup oatmeal
  • 2 tbsp honey or coconut palm syrup
  • Spices, such as vanilla powder/seeds or cinnamon.

Mash bananas and oatmeal with a fork to make them a thick and sticky dough. Add seasoning, such as vanilla, honey and/or cinnamon. Shape into small balls. If the dough is too runny, add a little oatmeal, but not too much so that the dough does not get too thick & the balls don’t get too dry. Arrange the balls on a baking tray covered with baking paper. Bake at 350 Fahrenheit/175 Celsius degrees for about 15 minutes. Keep the snack balls in a closed glass jar in the refrigerator and use within a week.

(gluten-free, sugar-free, dairy-free)

Cake tin diameter: 17 cm

BASE:

2 soft steamed beets

3 organic eggs

0,5 cup raw cocoa powder

0,5 cup almond flour (or for example coconut flour)

0,5 cup fat / oil (for example organic butter, olive or coconut oil, or 50:50)

5 tbsp organic honey

1,5 tsp baking powder

1 teaspoon psyllium husk powder

1 teaspoon vanilla extract

¼ tsp nutmeg

½ teaspoon of cinnamon

2 tablespoons rum (optional)

Pinch of sea salt

Set the oven to 175 Celsius degrees. Peel, chop and steam the beets so that they become a little bit soft. (You can keep some of the dyed water for coloring the cake filling). Stir in the beets and eggs in a blender. Add raw cocoa powder, almonds and melted butter / oil, honey, baking powder and psyllium husk powder. Season with vanilla, nutmeg, cinnamon, rum and sea salt. Cut a circular piece of baking paper on the bottom of the cake mold, so that the cake is easy to move later. Grease the sides and pour the batter into the tin. Bake the cake in the oven for 35-45 minutes. Stick a match stick into the cake to test if it’s ready – if no dough sticks on it when you pull it out, your cake is baked. Take the cake out of the oven and allow to cool before cutting and decorating.

PINK FILLING:

0,5 cup macadamia nuts (or, for instance cashew nuts)

5 tbsp coconut oil

2 tbsp organic honey

Juice of half a lemon

1 teaspoon vanilla extract

Pinch of sea salt

+Pink colour by adding e.g. red beet juice or some berry powder.

Chop the nuts, for example in a blender. Add melted coconut oil, honey and lemon juice. Mix until smooth. Add vanilla extract and a little bit of salt. Mix. Colour the filling, for example by adding some water left from steaming the beetroots, or by using some berry powder.

GORGEOUS CHOCOLATE GLAZE:

8 fresh Dates

5 tbsp raw cocoa powder

5 tbsp coconut oil

1/4 cup water

Pinch of sea salt

Puree the dates and melted coconut oil in a blender. Add water and raw cocoa powder. Mix to a smooth paste. Add a dash of sea salt. Add some water, if the mixture is too thick.

STACKING:

Place the cooled cake on a serving tray. Cut the cake in half horizontally with a sharp knife. Spread the light pink filling on the bottom piece of the cake. Grate some raw chocolate or raw cocoa mass into the filling. Place the upper half of the cake on upon filling. Frost the cake with chocolate glaze. Grate some raw chocolate or raw cocoa mass onto the surface. Decorate the cake with dried berries and chocolate covered berries. Serve and enjoy! Store leftover cake in the refrigerator.*